Saturday, December 22, 2012

Happy Poo

Poo vinyl decal for the toilet made on my Silhouette Cameo. I used this image (but accidentally cut off the poo's arm) and traced it in the Silhouette program. The girls LOVE the poo and always yell "there's poo on the toilet" and make me flinch before realizing they mean the sticker. They think that's funny:) The little carpet is from Japan. 
*


Thursday, December 20, 2012

Iced Mocha Addiction

Every day since this past August I have an Iced Mocha. Rain, sun, snow: I have one. At about 2 pm to be exact. After picking Ava up from school and before getting Emily. If I am out near the military base and won't be home in time to have a homemade one, I buy one from the coffee shop there (the headaches from not having one are killer!) but Jon, and I am starting to feel the same way, think mine are way better.  I don't ever claim to make anything better than anyone when it comes to cooking (does that make sense?) but these are pretty much the best:) I think because I actually took the time to perfect them, to mess around with amounts. Below I have written out exactly how I make them. The recipe is originally from Pioneer Woman and although  it seems like a lot of steps and too fussy for some, they really are worth it:)
*I make mine with half decaf and half regular coffee*
You will need (for a much smaller batch than the original) for the coffee part which has to sit over night:
1. about 6oz (that's half a bag of Duncan Donuts Coffee) decaf ground coffee.
2.   about 6oz (that's half a bag of Duncan Donuts Coffee) regular. I used Duncan Dark.
3. a 2qt pitcher with lid (you'll need two pitchers to house the coffee separately after they are done "brewing") 
4. mesh strainer that fits over the pitcher
5. paper towels
 To make the coffee:
1. take half a bag of decaf or regular (about 5.5-6 oz)and dump in 2qt pitcher. Fill with cold water to 2qt line. Use a fork to mix it up and get all the grounds wet. 
2. Cover with lid and let sit about 8 hours (over night). See photo above? That's Frank making sure the coffee sits over night!
3. When it's ready, take an empty pitcher and place strainer over opening. Lay 1 layer of paper towels over strainer, pour coffee over paper towels and strain. 
4. Cover with lid and label if it's decaf or regular. Don't want to get those mixed up! Repeat with the other (decaf or regular). You can do them both at the same time it just means you need more pitchers! I have to have a mixture as the regular strength is just way to strong for me. I would be up till the next day if I just had the regular.

Above is the coffee after I have strained it. That's how much it makes. It lasts about a week with me just drinking it during the week and Jon having some on the weekend. 
What you need to make it divine:
1.  approx. 2.5 tablespoons of Fat Free sweetened condensed milk (I keep the left overs in a container in the fridge)*
2. approx. 1 tablespoon of Lite chocolate syrup*
* in a small microwavable bowl mix the chocolate and condensed milk and microwave just enough to soften as I keep these things in the fridge and when added to cold coffee they just don't mix well.
3. 1/2 cup to 3/4 cup Low fat milk
4. Ice (I use ice made from the regular coffee; see photo below)
All my measurements are based on using one of these 24 oz cups
Pour about 1/4 cup regular and 1 cup of decaf into a cup. Add heated syrup and condensed milk; stir. Add milk. add a little bit off ice and you're done! Of course you'll have to adjust the amounts of everything till it's how you like it:)


I bought these ice cube trays on Amazon just for this purpose; to make coffee ice cubes! 
Done!!

If anyone makes these using this "tutorial", let me know! I'd love to know if it helped and how it was. 

Wednesday, December 19, 2012

Teacher Gifts (Christmas)


Two boxes of donuts for Ava's teachers (she has two teachers). Made from wool felt, beads and this pattern reduced 70% which puts them at about 2.5" across.  The boxes are light weight card stock made on the Silhouette using one of their templates BUT reduced in size (I had to play around till I found the right size). Look at the little scallop inserts! So cute! I used plastic from a sheet protector for the box windows. 
 And these are the ones for Emily's teacher. It's only one box  (she has one teacher and no aid) but I wanted to show both sides because Emily decorated hers. 
 and these are what they look like on the tree.

Sunday, December 16, 2012

Monsterz Mini

A mini quilt made with a left over block from the twin sized quilt I made ages ago but have never shown. I did the quilting! ALL. BY. MYSELF!! I free motioned quilted this and a large quilt. How many different ways can I say it? It's a huge thing to free motion quilt something yourself! I'm so super proud of myself. Pat pat pat (on my back). 
*
See the Zombie on the left? That's an Emily and Mommy collaboration. The "Dude" on the right is something from Emily's brain:)
Quilt Pattern is "Spools" by Thimble Blossoms. The fabric line is Monsterz by Cloud9fabrics. AND, I spray basted this and the twin size. I had brought the spray baste stuff back with me from the states last December.  LOVE that stuff and will never use pins again. I don't remember the brand I have but it's from Joann's.
*
A project below in the works. I pinned a million pom pom projects on pinterest trying to find color combos I liked. I'm using pom pom makers I got from Joann's back when we went home on the 1st emergency leave for Jon's mom. I bought all the sizes they had. I love these things. I had made about 20 red ones while sitting in the hospital room. 


**
Below are 3 instagram photos. Sorry that I post these on facebook 1st and then you see them again here:) 
1. Emily did this in art class with the help of one of those how-to-draw books. 

2. My silly girls love my phone.

3. And yesterday we finally went to the Nuremberg Christmas market. It was wayyy to crowded to have kids there. It was so beautiful though and I can finally say we went. It's something Jon wanted to do very badly. He really wants to see the Dresden one but now that we saw this one and how crowded it was....We'll see. 

Wednesday, December 12, 2012

Reindeer Busts

Paper reindeer busts! The pattern is from here and although I did them on the Silhouette you can definitely do them by hand. I still had to use my scissors  to cut some of it out. I did 3 different sizes and one thick glitter paper purchased at Joann's.  The wood plaques are from the shop in Stuttgart with paper deoupaged to them. Emily assembled the purple one:) I love these little busts so much! The plaque are 3.5", 5" and 7" so you can get an idea of the reindeer sizes.
*
Below is a Silhouette projects for the girls. I had the machine cutout snow globes and they assembled them and drew the scenes. 

Monday, December 10, 2012

Zippered Bag: kindergarten Paper

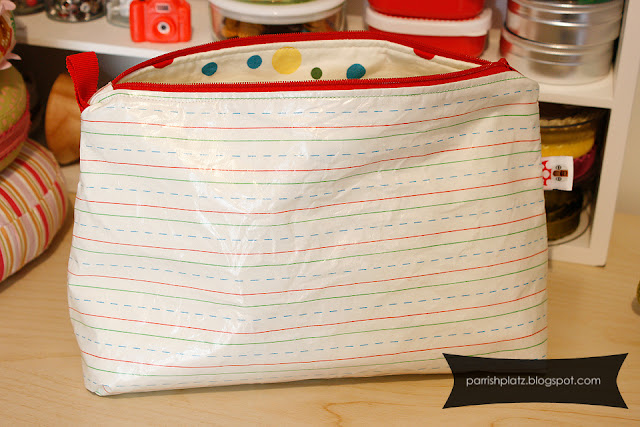
A zippered bag made from cotton fabric and iron-on vinyl. The iron-on vinyl wrinkles bad and stays wrinkled. Oh well. Kind like the look of it now. Cotton fabric is, I think, Bungle Jungle dashed Stationary for Moda. This was made for Jenny B.
*
Now that I have lured you here with crafty stuff.....
My neighbor took the first one (and it's her sled). My camera froze up in this freezing weather right after I took about 10 photos. We received about 12 inches of snow last night and today. Ok maybe not 12 but it was a lot!


Wednesday, December 5, 2012

Sparkly Heat Transfers


I made these weeks ago with my silhouette cameo, heat transfer and designs from the silhouette store (I added the sparkly spikes per Emily's request). The t-shirts are from Old Navy (the pink one) and the purple one is from KIK a German store here. I got it for $2 euro I think. But it's been a month or so since making them and Ava's Pegasus has started to peel bad from the wash. I guess I didn't iron it good. Boo.

Monday, December 3, 2012

Ghost Zippy's


"Ghost" zippered bags. To hold your..."ghosts"...
*
Emily saw them and said, oh look it's a bird holding a ghost by the tale! 
That's right Emily! And dad, if you're reading this these are not what they look like and I do have class and you are not to be ashamed of me. 
*
This lovely Bird one is for my niece who is named Bird. She will be 17 in a couple of weeks. it does make me laugh every time I look at it. Darn birds will pick up anything!
This other plain "ghost" is for my sister-in-law. I'm almost positive she doesn't see my blog so it's ok to post about them. The 1st one I made in 2008 is posted here.
 and below is another ear-bud holder, this one for my sister-in-law.  
This is a fast project perfect for stockings.
 Decorations, Emily's art, Ava and Jon and more Japan cuteness.

Related Posts Plugin for WordPress, Blogger...